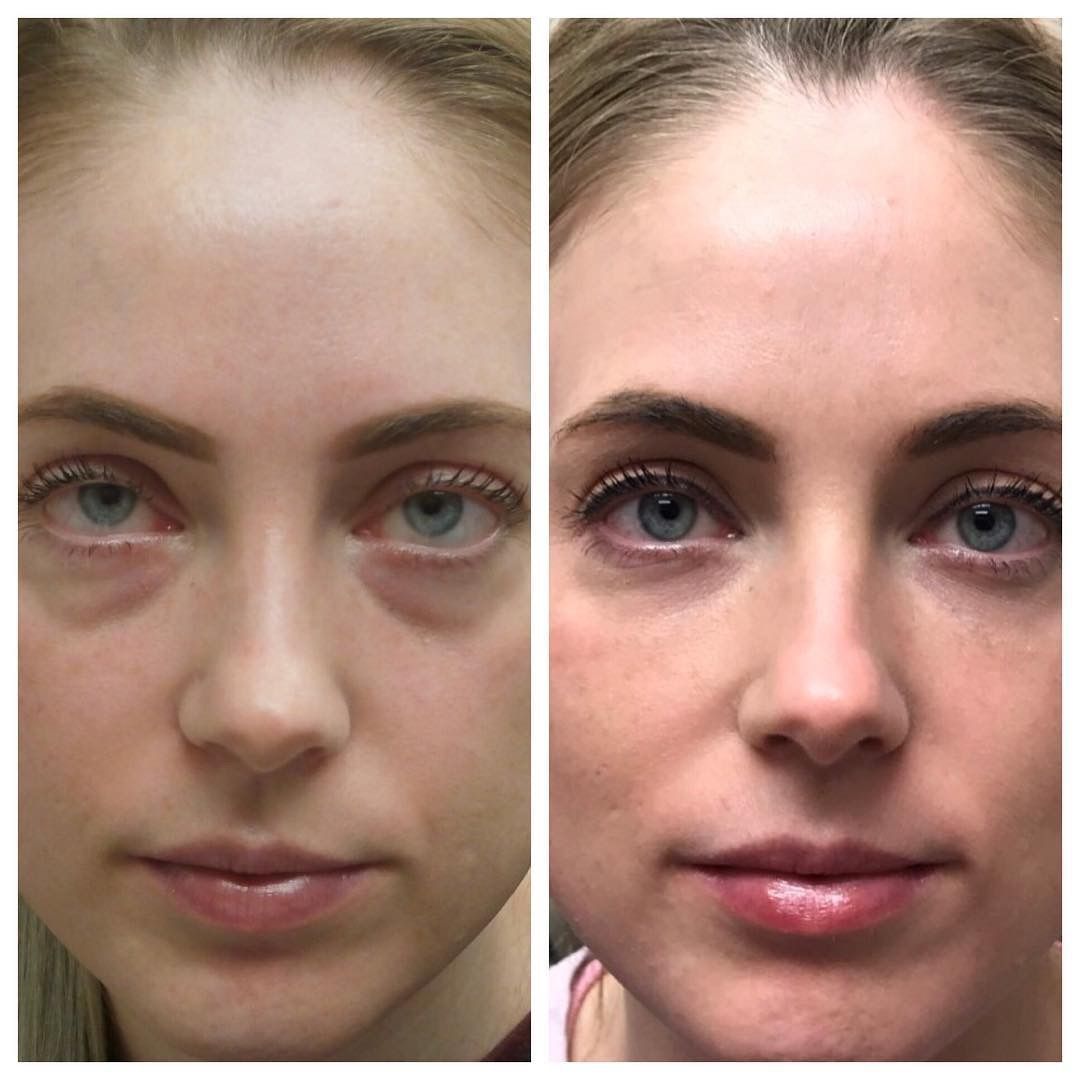
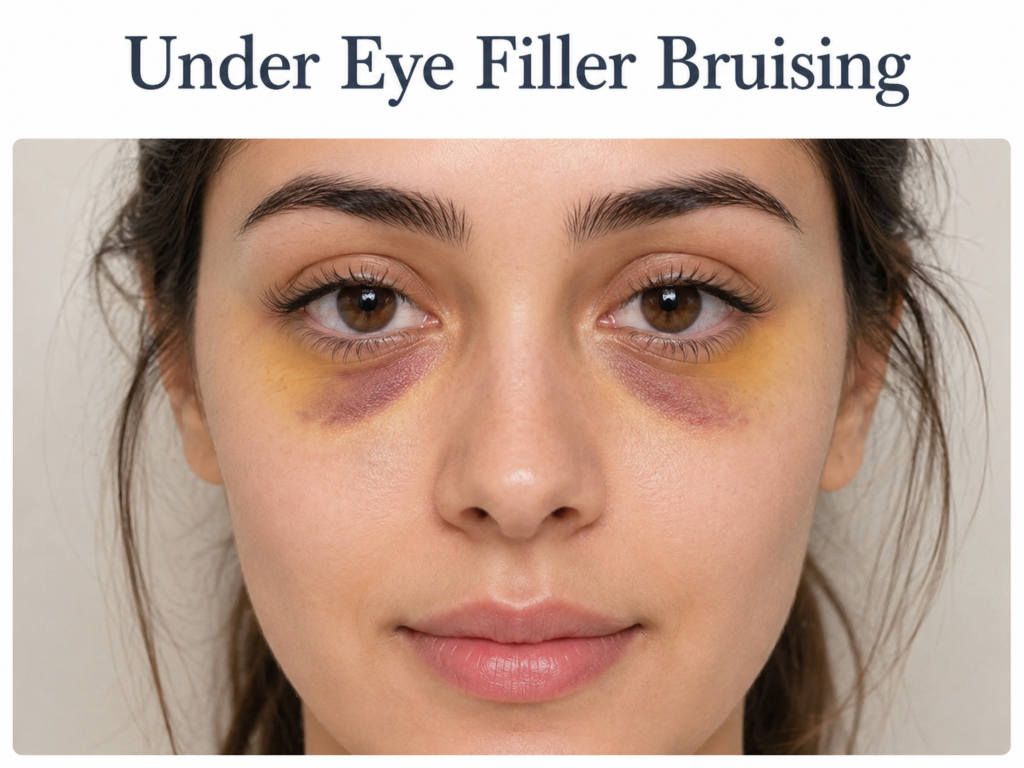
You had your tear trough treatment, got home, and what greeted you in the mirror looked considerably worse than the hollow you came in to fix. A deepening purple shadow, some puffiness, and a sinking feeling that something has gone wrong. Almost certainly, nothing has. Under eye filler bruising is the most common side effect of tear trough injections — it affects roughly one in five patients — and in the vast majority of cases it is entirely temporary, self-resolving, and tells you nothing about the quality of the result underneath.
This guide covers exactly what you need to know: why bruising happens in the periorbital area specifically, the day-by-day colour timeline, how to reduce your risk beforehand, how to manage it at home, how to cover it with makeup, and how to tell normal bruising apart from the small number of complications that actually need clinical attention.
Is Under Eye Filler Bruising Normal?
Why the Under-Eye Area Bruises More Than Any Other Facial Zone
Three anatomical factors combine to make the tear trough the highest-bruising-risk injection site on the face. First, the periorbital skin is the thinnest on the body — roughly 0.5 mm — with almost no subcutaneous fat cushioning between the surface and the capillary network beneath. Second, the infraorbital area contains a particularly dense microvasculature: the angular artery, infraorbital artery branches, and numerous unnamed capillaries all course through the tissue targeted during tear trough treatment. Third, any blood that escapes a disrupted vessel shows through that transparent skin almost immediately and with little dilution. Even optimal injection technique cannot eliminate this risk entirely — it is an anatomical reality rather than a sign that anything went wrong.
Published clinical data puts the bruising incidence at between 19 and 24 percent of tear trough filler patients. It is the single most frequently reported side effect, ahead of swelling, tenderness, and redness. For most patients it resolves completely within seven to fourteen days without any specific medical intervention.
Bruising vs Swelling — Understanding the Difference
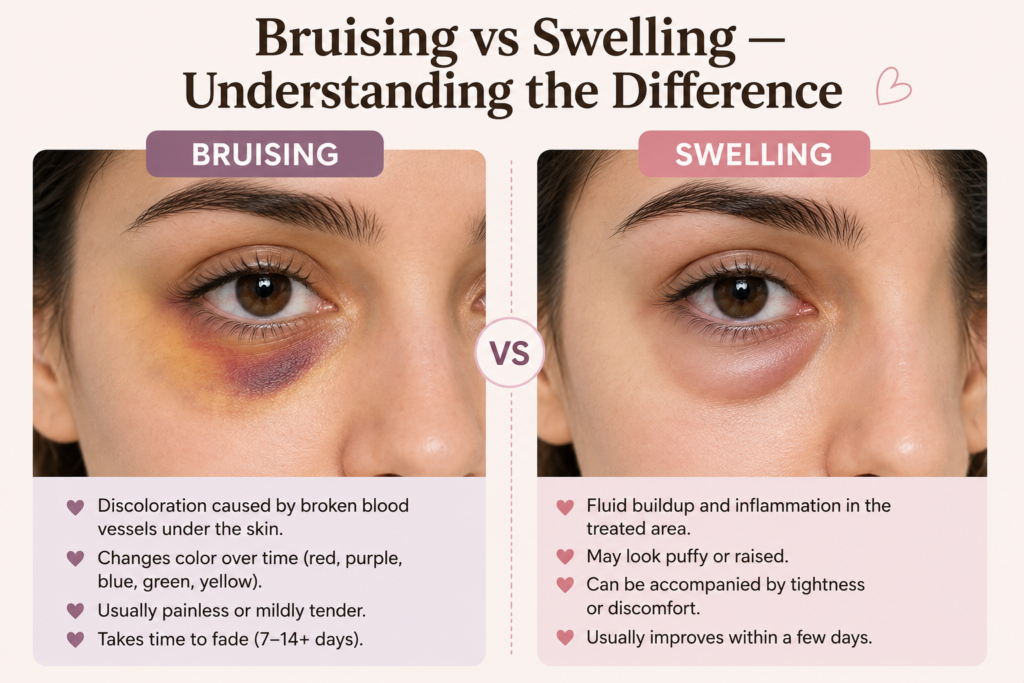
Bruising (ecchymosis) and swelling (oedema) are different processes that often occur together after filler and are frequently confused. Swelling is fluid accumulation in the tissue as part of the normal inflammatory response; it peaks at 24 to 48 hours, is skin-coloured or slightly pink, and resolves within about a week. Bruising is blood from disrupted capillaries pooling beneath the skin; it starts red-purple, progresses through blue and green to yellow, and typically takes seven to fourteen days to clear. Swelling dominates the first two days and can partially hide the bruise beneath it — which is why many patients are surprised when bruising appears to worsen on day two or three as swelling starts to settle. This is normal. Under eye filler swelling stages mostly for 24 to 48 hours but sometime it takes more time.
Causes and Risk Factors
Injection Technique: Cannula vs Needle
The single most controllable variable in bruising risk is the choice of injection instrument. A blunt-tip cannula — inserted through one small entry point and guided through the tissue without cutting — reduces bruising by up to 60 to 70 percent compared with a fine needle, because its flexible tip pushes blood vessels aside rather than puncturing them. Many specialist tear trough injectors use a cannula as their default for exactly this reason. A fine needle allows more precise localised placement but requires multiple passes, each of which carries a new risk of vessel disruption. If bruising reduction matters to you, ask your injector directly which instrument they plan to use and why.
Patient Risk Factors You Can Modify
Several factors meaningfully increase bruising risk and can be addressed before your appointment.
- Blood-thinning medications and supplements: Prescription anticoagulants (warfarin, rivaroxaban, clopidogrel) and antiplatelet drugs (aspirin) significantly impair clotting. Never stop prescription medications without medical advice — but disclose everything to your injector. OTC supplements including fish oil (omega-3 fatty acids), high-dose vitamin E, garlic, turmeric, and ginkgo biloba also reduce clotting efficiency and can usually be safely paused seven to ten days before treatment.
- NSAIDs: Ibuprofen and naproxen inhibit platelet function. Switch to paracetamol five to seven days before your appointment.
- Alcohol: Dilates blood vessels and impairs platelet aggregation. Avoid for at least 48 hours before treatment — 72 hours is better.
- Skin sensitivity and history: Patients with rosacea, very fair or thin skin, or a personal history of bruising easily after injections or dental procedures will generally experience more visible bruising regardless of technique. Mention this at your consultation.
3. The Day-by-Day Healing Timeline
Understanding what normal bruising looks like at each stage removes a significant amount of anxiety — particularly during the days 3–4 window when it looks most alarming but is simply progressing normally.
| Stage | Colour | What Is Happening | Action |
| Immediately after | Faint red or pink at entry points | Minor capillary disruption; swelling begins | Ice pack, head elevated |
| Days 1–2 | Red-purple; swelling peaks | Blood pooling beneath skin; swelling may hide bruise extent | Continue icing; sleep elevated; no alcohol or exercise |
| Days 3–4 | Deep purple to blue-black | Oxyhaemoglobin converts to deoxyhaemoglobin — darkest stage | Arnica gel; cold compress; makeup coverage if needed |
| Days 5–7 | Green then yellow | Biliverdin/bilirubin conversion — active healing underway | Arnica; LED therapy if available; colour corrector makeup |
| Days 8–14 | Fading to skin tone | Final clearance; filler integrating | Review appointment at 14 days to assess result |
| Beyond 14 days | Persistent discolouration | May indicate Tyndall effect, hemosiderin staining, or PIH | Seek clinical review — do not wait |
The most important point in the table above: the bruise will look worse before it gets better. The deep purple of days three and four alarms almost every patient who has not been warned about it. The colour progression from purple to green to yellow is the immune system working exactly as it should. Do not judge the outcome of your filler until the 14-day mark when swelling has fully resolved and the hyaluronic acid has integrated into the periorbital tissue.
4. Bruising by Skin Tone (What Competitors Miss)
Fair to Medium Skin: Visibility and Colour Progression
On lighter skin tones, even a small volume of extravasated blood shows vividly through thin periorbital skin. The blue-purple at days three and four can look alarming but the colour progression is easy to track — the transition to green and yellow is unmistakable and reassuring. Colour-correcting makeup in peach or salmon tones is highly effective for coverage on fair skin.
Darker Skin Tones: Post-Inflammatory Hyperpigmentation Risk
Patients with Fitzpatrick skin types IV, V, and VI face an additional consideration that no major competitor resource addresses: post-inflammatory hyperpigmentation (PIH). Any trauma to the periorbital tissue — including the inflammatory response triggered by filler injection and bruising — can stimulate melanocytes to overproduce pigment at the injury site. This PIH appears as brown or grey-brown discolouration that persists weeks to months beyond the bruise itself and does not respond to arnica or cold.
If you have a deeper skin tone, discuss PIH risk explicitly before treatment. Starting a topical brightening routine (vitamin C serum, niacinamide) before your appointment and applying broad-spectrum SPF 30 or higher from the day after treatment are the most effective preventive measures. If PIH develops, treatments including azelaic acid, topical niacinamide, and targeted laser therapy can help, but the resolution timeline is measured in weeks rather than days.
5. Before Your Appointment: Reducing Bruising Risk
The Supplement Protocol: What to Stop and What to Start
Most pre-treatment guidance focuses exclusively on what to avoid — but there are two supplements with genuine evidence for reducing bruising severity that you should consider starting before treatment.
- Bromelain (500–1,000 mg daily): A proteolytic enzyme from pineapple with well-documented anti-inflammatory and fibrinolytic properties. Clinical studies support its use for reducing post-procedure bruising and swelling. Start three to five days before your appointment and continue through the healing period. Use cautiously if you take blood thinners.
- Vitamin K: Essential for the synthesis of clotting factors. Increasing dietary vitamin K through leafy greens — kale, spinach, broccoli, Brussels sprouts — in the week before treatment may optimise clotting efficiency. A supplemental vitamin K preparation is also available; discuss with your injector.
On the avoidance side: stop fish oil, vitamin E, garlic supplements, turmeric, and high-dose vitamin C (which can affect iron metabolism) at least seven days prior. Avoid NSAIDs for five to seven days, and alcohol for 48 to 72 hours. Hydrate consistently in the days before your appointment — well-hydrated tissue heals more efficiently — and arrive rested.
6. After Treatment: Managing Bruising at Home
Cold Compress, Arnica, and Elevation
Apply a cold compress wrapped in a clean cloth for 10 to 15 minutes on, 15 minutes off, for the first two to three hours after treatment. Cold causes vasoconstriction, limits the spread of any active capillary bleeding, and reduces histamine-driven inflammation. Never apply ice directly to the skin, and never apply firm pressure to the treated area within 48 hours — gentle contact only, as filler is still integrating.
Arnica montana is supported by reasonable evidence for reducing both bruise severity and duration. Use oral arnica from the day before your appointment through the healing phase, and apply arnica gel gently around (not directly over injection sites) from day two onward. Pat rather than rub — dragging the product risks displacing filler in the first week.
Sleep with your head elevated on an extra pillow for the first three to five nights. Sleeping flat allows fluid to pool in the loose periorbital tissue overnight, producing a markedly worse appearance on waking. Avoid alcohol, vigorous exercise, saunas, steam rooms, and hot showers directed at the face for the first 48 hours. If you need pain relief, use paracetamol — not aspirin or ibuprofen, which worsen bruising even when taken after treatment.
Professional Treatments That Accelerate Healing
- LED light therapy: Low-level red and near-infrared light reduces inflammation and stimulates cellular repair. A series of LED sessions in the days following treatment can reduce bruising duration meaningfully.
- Pulsed dye laser (PDL): Targets haemoglobin in superficial bruising and can accelerate clearance significantly — typically reserved for more severe or persistent cases.
- Medical-grade topical treatments: Some clinics offer prescription-strength vitamin K preparations or specialised post-procedure topicals distinct from pharmacy arnica products.
7. How to Cover Bruising with Makeup
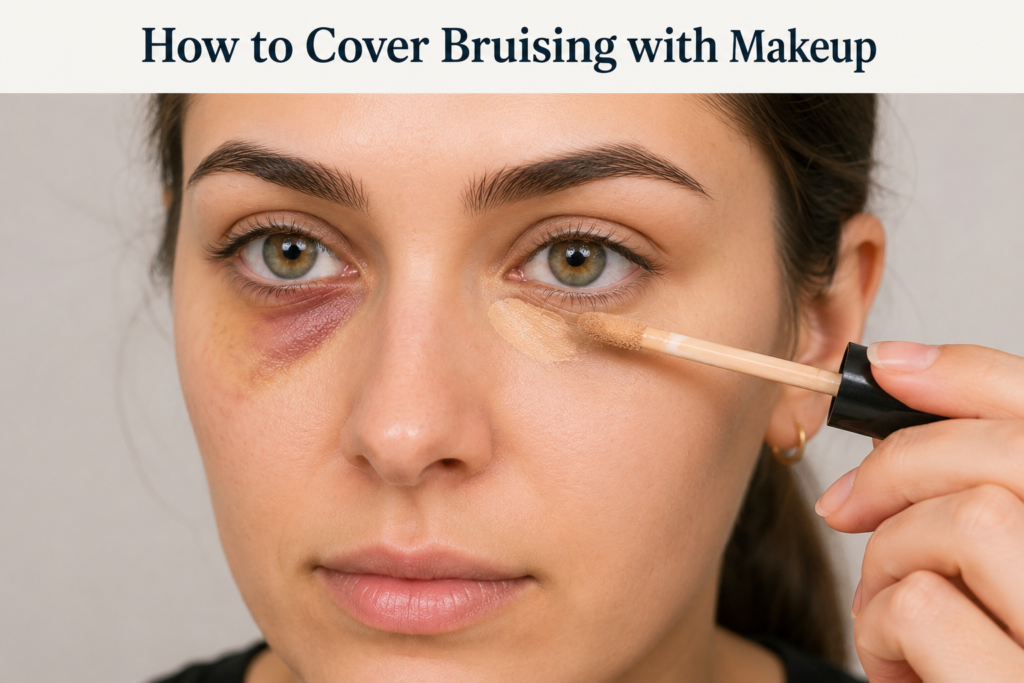
Wait a minimum of 24 hours before applying anything to the treated area. Injection entry points remain microscopically open for several hours; applying cosmetics before they seal carries a small infection risk.
Colour Corrector First, Then Concealer
Standard concealer applied directly over a bruise rarely works because purple and green tones show through skin-coloured pigments. The solution is colour theory: apply the complementary colour first, then layer concealer on top.
| Bruise Stage | Corrector Colour | Best Skin Tone |
| Days 2–4: Purple-blue | Peach or salmon corrector | Fair to medium skin |
| Days 2–4: Purple-blue | Orange or burnt sienna corrector | Medium to dark skin |
| Days 5–7: Green-yellow | Light lavender (optional — often unnecessary) | Fair skin only |
Apply corrector with a damp beauty sponge using a patting motion — never rubbing or dragging, which can displace filler in the first week. Layer a full-coverage concealer on top and set with translucent powder. For significant bruising, clinical-grade products like Dermablend Cover Creme provide the pigment density that standard consumer concealers lack and are specifically designed for post-procedure camouflage.
8. Planning Downtime: The Recovery Schedule Guide
Honest downtime guidance is one of the most consistently missing elements in competitor resources. Here is what the recovery timeline means in practical, real-world terms.
| Risk Profile | Expected Bruising Duration | Realistic Social Downtime |
| Low risk — cannula technique, no blood thinners | 3–5 days | 2–3 days; makeup coverage from day 2 |
| Average risk — typical patient profile | 5–10 days | 4–5 days; consider professional LED |
| Higher risk — needle technique, blood thinners, sensitive skin | 10–14 days | 7–10 days; professional treatment advised |
| Prolonged bruising (under 5% of patients) | Beyond 14 days | Clinical review required |
Schedule tear trough filler at least three weeks before any event you are unwilling to attend with visible bruising. Friday appointments are popular because the peak bruising days fall over the weekend. Keep a daily photograph record — same lighting, same angle, no filters — from immediately after treatment. This gives you an objective healing record and provides your injector with accurate information if you have a concern.
9. When Bruising Is Not Normal: Complications to Know
| Seek Immediate Medical Attention If You Notice: |
| Blanching — sudden white or pale patches near the injection site (possible vascular occlusion) |
| Severe or disproportionate pain during or after injection |
| Mottled skin with purple-black patches inconsistent with normal bruising spread |
| Any change in vision — blurriness, field loss, or sudden visual disturbance |
| Skin that becomes increasingly hot, hard, or painful days after treatment (possible infection) |
Tyndall Effect vs Bruise vs Hemosiderin Staining vs PIH
Four conditions can present as under-eye discolouration after filler and require completely different management. Knowing which you are dealing with determines the right response.
| Condition | Colour | Timeline | Treatment |
| Normal bruising | Purple → green → yellow | Resolves in 7–14 days | Arnica, cold compress, time |
| Tyndall effect | Persistent blue-grey; no colour change | Does not self-resolve | Hyaluronidase dissolution; retreatment at correct depth |
| Hemosiderin staining | Brown or copper tone after extensive bruising | Persists weeks to months | Vitamin C, niacinamide; laser in some cases; not responsive to arnica |
| PIH (darker skin tones) | Brown-grey darkening from melanocyte response | Weeks to months | SPF, niacinamide, azelaic acid, vitamin C; laser if persistent |
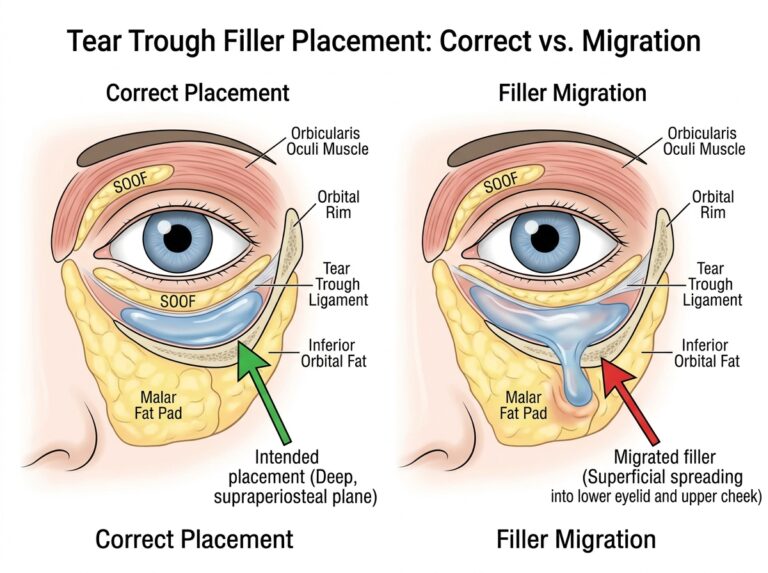
The Tyndall effect is caused by filler placed too superficially — the hyaluronic acid gel scatters light through the thin under-eye skin creating a persistent blue-grey cast. Unlike a bruise, it does not progress through colour stages and does not resolve without treatment. Hemosiderin staining occurs when extensive bruising leaves iron deposits (haemosiderin) in the skin that do not clear with normal bruise resolution. Both require clinical assessment — do not wait beyond two weeks if discolouration is not following the normal purple-to-yellow progression.
10. Frequently Asked Questions
How long does bruising last after tear trough filler?
For most patients, bruising resolves fully within 7 to 14 days, progressing from red-purple on days one and two, to deep blue-purple on days three and four, to green and yellow from day five, and clear by days ten to fourteen. Patients with sensitive skin or clotting-related risk factors may take slightly longer.
Does bruising mean something went wrong?
No. Bruising in roughly one in five patients is a documented, expected outcome of tear trough filler — not a sign of poor technique or wrong product. The periorbital capillary network is dense and the skin is thin; even optimal placement carries an inherent risk of minor vessel disruption. It says nothing about the quality of the result you will see once healing is complete.
Will bruising make my dark circles look worse?
Yes — temporarily. During the bruising phase, the under-eye area will look darker than it did before treatment and the dark circles may appear considerably worse than your baseline. This is entirely temporary. As the bruise clears and swelling resolves, the area improves beyond your pre-treatment appearance. The final result is assessable at the two-week mark — any judgment made during the bruising phase is premature.
Why does my bruise look darker on day 3 than on day 1?
Because the swelling present on day one partially compresses and hides the bruise beneath. As swelling starts to settle on days two and three, the underlying bruise becomes more visible. Additionally, the biochemical progression from oxyhaemoglobin to deoxyhaemoglobin naturally deepens the colour before it begins to fade. Both processes are normal.
Can I dissolve my filler if bruising won’t go away?
Not necessarily, and not without a clinical review first. Persistent discolouration beyond two weeks may be Tyndall effect, hemosiderin staining, or PIH — not all of which are resolved by dissolving the filler. Hyaluronidase is the correct intervention for Tyndall effect, but it will not clear hemosiderin deposits or PIH. Seek a review appointment to identify the cause before deciding on treatment.
When can I return to work after under eye filler?
There is no medical restriction on returning to non-physical work the following day. Most patients in desk-based or remote roles return the next day with makeup coverage. Patient-facing professional roles, camera work, or high-intensity physical jobs may warrant three to five days off. Plan around your comfort with visible bruising rather than any clinical limitation.
The Bottom Line
Under eye filler bruising is common, it is normal, and it is temporary. The anatomy of the periorbital zone — thin skin, dense capillaries, minimal cushioning — makes bruising a realistic outcome for around one in five patients regardless of how well the treatment is performed. What matters is how well you prepare for it, how effectively you manage it, and how clearly you understand what each stage of the healing process looks like.
Prepare by stopping blood-thinning supplements, staying hydrated, and starting bromelain in the days before your appointment. Manage it with cold compresses, arnica, head elevation, and LED therapy if available. Cover it with a peach or orange colour corrector followed by full-coverage concealer. And above all — do not judge the outcome of your filler during the bruising phase. The result you are waiting for becomes visible at two weeks, and for the right patient with the right injector, it is well worth the healing time it takes to get there.
If any discolouration does not follow the expected purple-to-yellow progression, persists beyond fourteen days, or is accompanied by pain, blanching, or any vision change — contact your treating clinic without delay.
| Key Takeaways |
| Bruising affects 19–24% of under eye filler patients — it is an expected side effect, not a complication. |
| Blunt cannula technique reduces bruising risk by 60–70% compared with fine needle injection. |
| Bruise looks WORST on days 3–4 — this is normal colour progression, not deterioration. |
| Stop: fish oil, vitamin E, NSAIDs, alcohol, garlic supplements before treatment. |
| Start: bromelain (500–1,000 mg daily) and vitamin K foods 3–5 days before treatment. |
| Arnica oral + topical and cold compresses are the core home recovery tools. |
| Peach/orange colour corrector + full-coverage concealer (e.g. Dermablend) camouflages bruising. |
| Darker skin tones: PIH risk is real — use SPF from day one post-treatment. |
| Tyndall effect = persistent blue-grey that does NOT fade → needs hyaluronidase, not time. |
| Hemosiderin staining = brown residual after extensive bruising → needs specialist review. |
| Plan 3 weeks before any major event. Book a 14-day review with your injector. |
Medical Disclaimer: This content is for informational and educational purposes only and does not constitute medical advice or a treatment recommendation. Always consult a qualified, licensed medical professional before any injectable cosmetic procedure. If you experience blanching, severe pain, or vision changes after filler, seek emergency medical care immediately.
References and Official Guidelines
This article was developed based on clinical safety standards and soft tissue filler guidelines provided by the following government health authorities:
- U.S. Food and Drug Administration (FDA): Dermal Filler Do’s and Don’ts for Soft Tissue Fillers – Official guidelines on the safety, risks, and approved anatomical uses of injectable hyaluronic acid.
- National Institutes of Health (NIH): Complications of Injectable Fillers and Avoidance – A comprehensive clinical study detailing the physiological responses to fillers, including edema, bruising, and vascular risks.

Sarah Mitchell is the founder and research editor of Under Eyes Filler, an independent patient-education resource. She is a researcher and writer, not a licensed medical professional. Her work is to read clinical studies and official FDA and ASPS guidance, then translate them into clear, honest explanations of under-eye filler results, recovery, risks, and realistic costs, so readers can prepare better questions for their own qualified provider.
[…] typically resolve within a week to ten days. If bruising is a concern for you, this resource on managing under eye filler bruising offers practical […]